Tuesday, 31 March 2015
Friday, 27 March 2015
Paytm wallet offers and Coupon Code : Get Rs.100
Get paytm wallet cashback offer and cashback coupons here and get extra cashback on adding money in your paytm wallet.This can be used to recharge your mobile and buying stuff.

Get your Paytm Wallet Cashback Offers here :
Get Rs.20 as Paytm Cash on loading Paytm Wallet using RuPay
Get Rs.20 as Paytm Cash on loading Paytm Wallet using RuPay Debit Card. Minimum order value Rs. 50.Maximum Paytm cash is Rs. 20
Free Rs.25 Wallet Cash on adding Rs.25
Rs.25 cashback on adding Rs.25 to Wallet.This code can be used 1 time per user/number/new
Get Rs 30 cashback of min recharge of 30 (new user)
Get Rs 30 cashback on minimum recharge of Rs 30. Offer valid for new user only on paytm.
Rs. 30 Cash Back on adding to Paytm Wallet { Master and Maestro Cards }
- This can be used to recharge, pay bills & buy stuff.
- Offer valid only on loading PayTm wallet using Master and Maestro Debit and Credit Cards.
- Cash back would be applicable only for Newly registered card on PayTm.
- Cashback would be credited in user’s PayTm Wallet within 24hrs.
Offer Page : Master / Maestro offer Details
7.5% Cash Back on adding to Paytm Wallet { ING Vysya Debit Card }
- This can be used to recharge, pay bills & buy stuff.
- Cashback would be applicable only for Paytm Newly registered Users i.e. for users registering on PayTm on and after 14th October 2014.
- Minimum amount to be loaded in PayTm Wallet to avail the offer is Rs. 300.
- Maximum cash back that can be availed is Rs. 50.
- Cashback would be credited in user’s PayTm Wallet within 24 hrs.
Offer Page : ING offer Details
5% Cash Back on adding to Paytm Wallet { AXIS Bank Debit and Credit card }
- This can be used to recharge, pay bills & buy stuff.
- Cashback would be applicable only for Paytm Newly registered Users i.e. for users registering on PayTm on and after 14th October 2014.
- Minimum amount to be loaded in PayTm Wallet to avail the offer is Rs. 300.
- Maximum cash back that can be availed is Rs. 50.
- Cashback would be credited in user’s PayTm Wallet within 24 hrs.
Offer Page : Axis bank more Details
For More Paytm Latest Coupons Deals and Promo Codes visit our Paytm Zone updating every our
Stay tuned for more updates..!!
Thursday, 26 March 2015
Tuesday, 24 March 2015
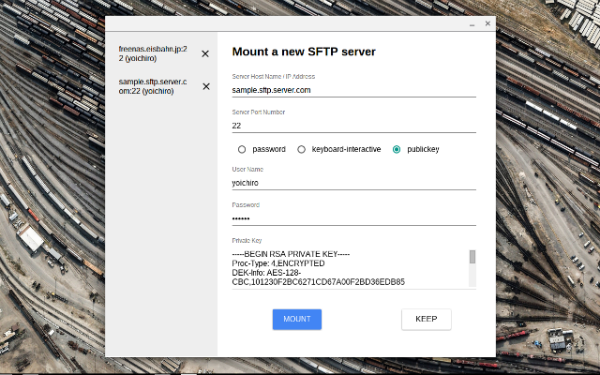
Three implementations of Chrome OS File System Provider have been released
Three implementations of Chrome OS File System Provider have been released
Hello. I write down about applications of Chrome OS File System Provider implementation I developed here.
Last year, I developed and published the application called “Chrome MySQL Admin”. This application provides you the UI to manage your MySQL server. In this application, I implemented certain feature. It is to connect to the MySQL server with SSH2 protocol. For instance, the Port Forwarding feature was implemented in the application. That is, users can connect to his/her MySQL server via firewall/ssh2 server. This feature was implemented with libssh2, of course, as NaCl module.
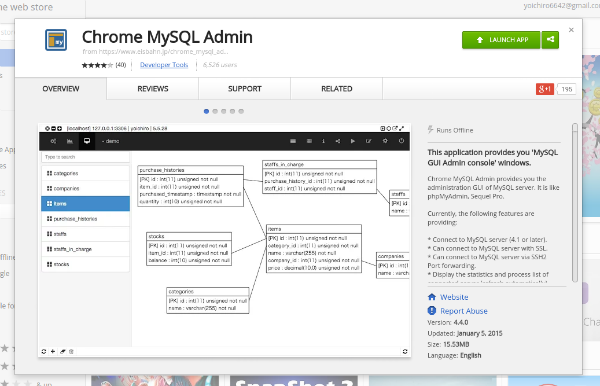
The Chrome MySQL Admin is hosted on Github:https://github.com/yoichiro/chrome_mysql_admin
One day of this January, I knew the existance of the ChromeOS File System Provider API. I translated the API reference to Japanese: here to study the usage of the API set. It was Beta yet at the time.
So, I also knew that the SSHFS was already existed for Linux/Mac. Specifically, the implementation of the SSHFS uses the SFTP protocol internally.In other words, the SSHFS is a wrapper of SFTP. That is, if I can write the code to communicate between my application and SSH2 server with SFTP, I can develop/provide the file system like as same as the SSHFS. Thelibssh2 library has some functions to use SFTP protocol. Finally, I guessed that I will be able to develop the File System Provider implementation for SFTP.
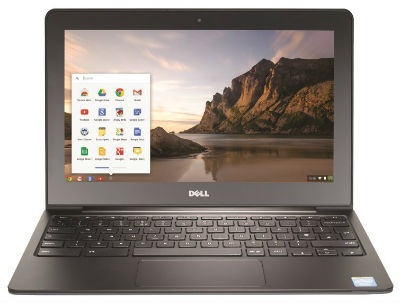
I ordered my Chromebook to develop the File System Provider implementation, and got it! (of course, I checked “Get it today”)
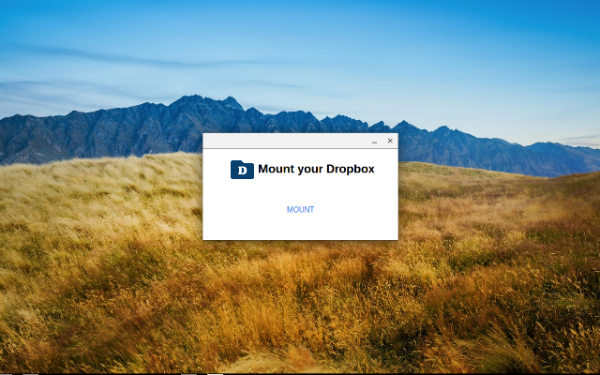
If I start developing the SFTP implementation soon, I thought that it will fail. Because I don’t know the detail behavior of the File System Provider API. As the first development, the FSP API and NaCl module combination is very difficult to me. Therefore, I started developing the first implementation using Dropbox Core API for training. In this case, can write with JavaScript code only. In other words, can develop the application on Chrome Dev Editor in Chromebook only.

Fortunately, Dropbox is providing enough APIs for implementing the File System Provider. I finally could complete developing the implementation for Dropbox. Also, I could study the behavior of File System Provider API via developing of the implementation.
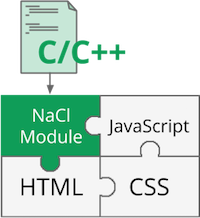
Then, I started developing of the SFTP implementation by using the experience of developing the Dropbox implementation. The communication logic must be written as NaCl module, because the libssh2 C library must be applied. To write and build the C++ code is difficult for Chrome OS. Therefore, I wrote and built the C++ code of NaCl module on my macbook air, then wrote the JavaScript code on my Chromebook. Of course, the implementation of the File System API can be tested on the Chrome OS only. Therefore, I needed to write the JavaScript code on my Chromebook.
As the first implementation for SFTP, I applied the multi-thread architecture. That is, when this application calls certain API, this application establishes the connection, handshakes, calls API and closes the connection. By this logic, multiple API calls are executed async. However, the handshaking cost was very large than my image. I modified the logic. That is, I implemented a queue to store the API call request. Each request will be executed sequentially, and the connection handshaked is shared by all requests. As the result, the application behavior became stable.

First, the SFTP implementation (SFTP File System) has been released. Second, the Microsoft OneDrive implementation (File System for OneDrive) has been released. I could develop the OneDrive implementation easily, because I already have the code set for Dropbox. Last, the Dropbox implementation (File System for Dropbox) has been released. And, I’m improving their implementations continuously to increase the performance and fix a bug…
In Japan, Chromebook is not spreaded. But, I believe that Chromebook has many possibilities in Japan as well. And, I’m already spending a long time in Chromebook than my MacBook Air. The file system provider api provides many users many usage we don’t know yet, I guess. I intend to contribute a lot of things for Chromebook world!
If you are interested in each implementation, please visit each Github repository from the following URLs:
- yoichiro/chromeos-filesystem-sftp
- yoichiro/chromeos-filesystem-onedrive
- yoichiro/chromeos-filesystem-dropbox>
Also, if you want to develop a new implementation, you should read the following page first:
Oh, do you have a Chromebook? No? If no, you should buy some Chromebook right now!
Thursday, 12 March 2015
15 Facts That Only Programmers Know And Most People Don't
15 Facts That Only Programmers Know And Most People Don't
The root is at the top of the tree.

Counting starts from zero, not one.

A parent may kill its children if the task assigned to them is no longer needed.

Most of the hacking scenes in movies are complete bullshit.

When you format your hard drive, the files are not deleted.

That '=' != '=='.

That Windows desktop's "Refresh" button is not some magical tool which keeps your computer healthy.

That 1 Mbps and 1 MBps internet connection don't mean the same thing.

The value of a semicolon ;

"|" key is not useless.

A programmer is one who deals with algorithms and design principles, not the one who repairs a computer.

That there is a thing called "Constant Variable" .

Ctrl + C and Ctrl + V have saved more lives than Batman and Robin.

You can never watch or listen to anything on the internet without having it copied to your computer first.

Sleeping with a problem, can actually solve it.

Counting starts from zero, not one.
A parent may kill its children if the task assigned to them is no longer needed.
Most of the hacking scenes in movies are complete bullshit.
When you format your hard drive, the files are not deleted.
That '=' != '=='.
That Windows desktop's "Refresh" button is not some magical tool which keeps your computer healthy.
That 1 Mbps and 1 MBps internet connection don't mean the same thing.
The value of a semicolon ;
"|" key is not useless.
A programmer is one who deals with algorithms and design principles, not the one who repairs a computer.
That there is a thing called "Constant Variable" .
Ctrl + C and Ctrl + V have saved more lives than Batman and Robin.
You can never watch or listen to anything on the internet without having it copied to your computer first.
Sleeping with a problem, can actually solve it.
Step by Step Guide to Create a Setup for a Web Application
Step by Step Guide to Create a Setup for a Web Application
Deployment of an application is big issue in application software development. Normally you have to check each and every possible scenario before deploying your application so that your current deployment doesn't affect the existing application.
Through Microsoft Visual studio .NET we can do it in a better way.
Through Microsoft Visual studio .NET we can do it in a better way.
In this article I would like to discuss about creating a setup project for a web application.
Let us discuss step-by-step process of creating installer for a web application. In this article I am mainly concentrating on Setup project. You can follow same steps for creating installer for any complicated project.
Step I:
Create a Simple web application using Microsoft Visual Studio .NET

Step II:
Create a Simple WebForm in the web project. You can also add some more Webform or other control in this project by creating separate directory or in same directory.

Step III:
Select Setup and Deployment Projects and than select Web Setup Project also specify the Location and name of your project.

After creating setup project right click on project and than select view, it will show different possible operations, which you can perform with this setup project.

These options are
- File System
- Registry
- File Types
- User interfaces
- Custom Actions
- Launch conditions
Step IV:
Select File system, it is use to create file system on the target machine. Through this you can specify what details you want to provide at the target machine.
For providing right click on web application project than select add it will display certain option out of that select project output. After that select all details you want to supply for target machine.


Step V:
Second Selection is Registry Selection in this selection you can specify the dll, which you want to install at client registry. For that you have to create exact structure of registry in the registry folder structure and then you can specify the required dll for installation in that structure.
Second Selection is Registry Selection in this selection you can specify the dll, which you want to install at client registry. For that you have to create exact structure of registry in the registry folder structure and then you can specify the required dll for installation in that structure.
You can create new folder by right clicking on that folder and than select new key and define key Name. Each key is associated with a property window where you can specify which dll you want to install in the registry.

Step VI:
Select User Interface from the view in this selection you can specify what are the screens you want to display during installation process. You can change it, remove it or you can define new screen by right clicking on the screen header.

Step VIII:
Select Launch Conditions through this condition you can specify your criteria, which are prerequisite for your application installation.

Step IX:
Now final step is compile the setup project. After compilation you will notice that it has generatedSampleProjectSetup.msi at applications bin/debug folder.
You can supply this msi the target machine, when you run this msi at target machine it will create a virtual directory as well as create same folder structure, which you have specified in File System. This installer will also install the specified those libraries in the registry which are specified in the Registry.
Now you can browse that application at the target machine in same way as you have done at your own machine.
Wednesday, 11 March 2015
Display Google map with reference to that Longitude and Latitude value that have came from the database using asp.net (c#)?
1.Your cs function to get lat and lan from DB
public string propLat = "";
public string propLan = "";


public void getLatLan(int PropertyId)
{
    DataSet dstPropMap = Tbl_PropertyMaster.GetPropertyDetailsbyId(PropertyId);
    if (dstPropMap.Tables[0].Rows.Count > 0)
    {
        propLat = dstPropMap.Tables[0].Rows[0]["Latitude"].ToString().Trim();
        propLan = dstPropMap.Tables[0].Rows[0]["Longitude"].ToString().Trim();
    }
}
2.Reference Google Link and Create a div with Id 'mapStreetView'<script type="text/javascript" src="http://maps.google.com/maps/api/js?sensor=false"></script> <div id="mapStreetView" style="height:500px;width:340px"></div>3.Your JS in aspx pagefunction initializeThisMap(lat,lan) { var mapOptions = { zoom: 8, center: new google.maps.LatLng(lat,lan), mapTypeId: google.maps.MapTypeId.ROADMAP }; var map = new google.maps.Map(document.getElementById('mapStreetView'), mapOptions); var marker = new google.maps.Marker({ position: map.getCenter(), map: map, title: 'Click to zoom in' }); google.maps.event.addListener(marker, 'click', function() { map.setZoom(12); map.setCenter(marker.getPosition()); }); }4.Calling JS function (at the Bottom of aspx page,so it dont affect any other JS)<script type="text/javascript"> initializeThisMap('<%= propLat %>','<%= propLan %>'); </script>To insert Google Map on web page, you can use Google Maps JavaScript API. So, if you have latitude and longitude from db, you can insert these parameters into your JS code:center = new google.maps.LatLng(-34.397, 150.644)Well, on your ASPX page you need to add a Google Maps, plenty of articles out there but something like this:<script src="http://maps.google.com/maps/api/js?sensor=false" type="text/javascript"></script> <div id="map" style="width: 356px; height: 566px;"></div> <script type="text/javascript"> var map = new google.maps.Map(document.getElementById('map'), { zoom: 7, center: new google.maps.LatLng(<%=SomeLatValue %>, <%=SomeLongValue%>), mapTypeId: google.maps.MapTypeId.ROADMAP }); </script>Then you need to have class level properties name SomeLatValue and SomeLongValue that you can bind (as shown in code).
Subscribe to:
Comments (Atom)